October Release 2025
Feature Release: Patient Waitlist
Release Date: October 2025
Environment: Production (All Regions)
Release Type: Major Feature Update
Module: Calendar | Appointment Profile | Patient Portal
Overview
We’re excited to introduce the Patient Waitlist — a powerful new scheduling enhancement in Vozo EHR designed to help practices manage fully booked calendars, reduce appointment gaps, and improve patient satisfaction.
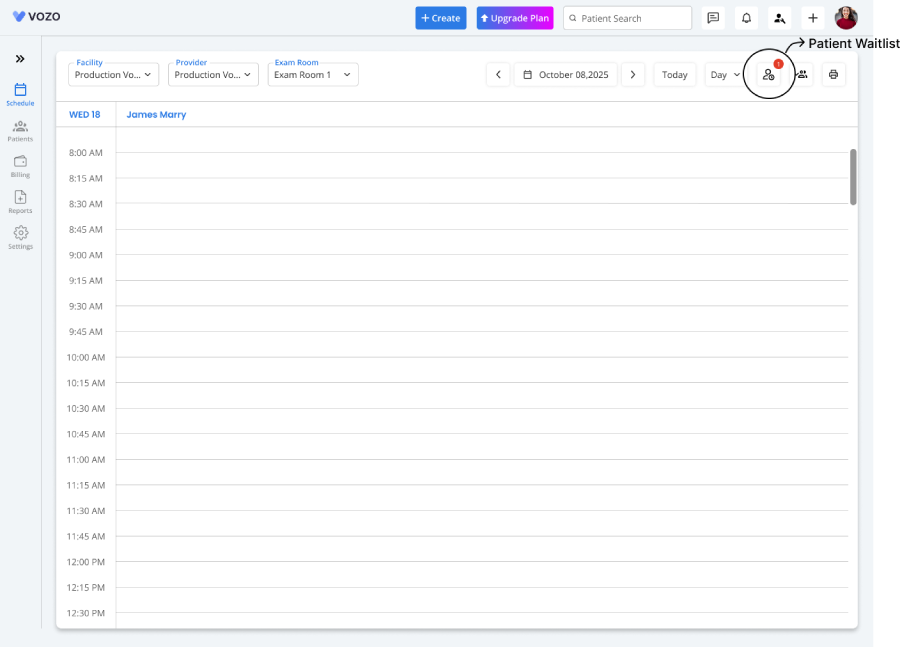
Calendar Enhancements
New Waitlist Button
The Waitlist List View provides a comprehensive dashboard with:
- Filter Options: Quickly sort and view patients by provider, facility, date, priority, and more.
- Waitlist Table Columns: Patient | Facility | Provider | Date | Time | Priority | Action
- Check Availability: A button at the top allows staff to instantly check open slots.
- Add Waitlist: A new button at the top-right corner opens a pop-up to add new waitlist entries.
Add Waitlist Pop-Up
Users can enter or edit patient details through an intuitive pop-up interface:
Fields:
- Patient Name (required)
- Appointment Profile
- Appointment Type
- Facility (required)
- Provider Name (required)
- Specialty
- Date (future dates only) (required)
- From / To Time (future times only) (required)
- Priority Level (required)
- Reason for Waitlist
Users can Save or Cancel entries. All saved data appears instantly in the table with options to Edit, Delete, or Transfer.
Smart Transfer Logic
The system continuously checks for open time slots in real-time.
- When a slot becomes available that matches a waitlisted patient’s preferences, a Transfer button appears for that specific patient.
- Clicking Transfer opens the appointment pop-up in the Calendar, automatically pre-filling all relevant details from the Waitlist for quick confirmation.
Over-Date Tracking
If a waitlisted request date has passed (e.g., fully booked provider on 07/10/25), that record is automatically marked with an “Over-Date” tag — making it easy for staff to identify and follow up.
Real-Time Notification
When an opening occurs, a notification badge appears beside the Waitlist icon on the Calendar page, alerting staff immediately.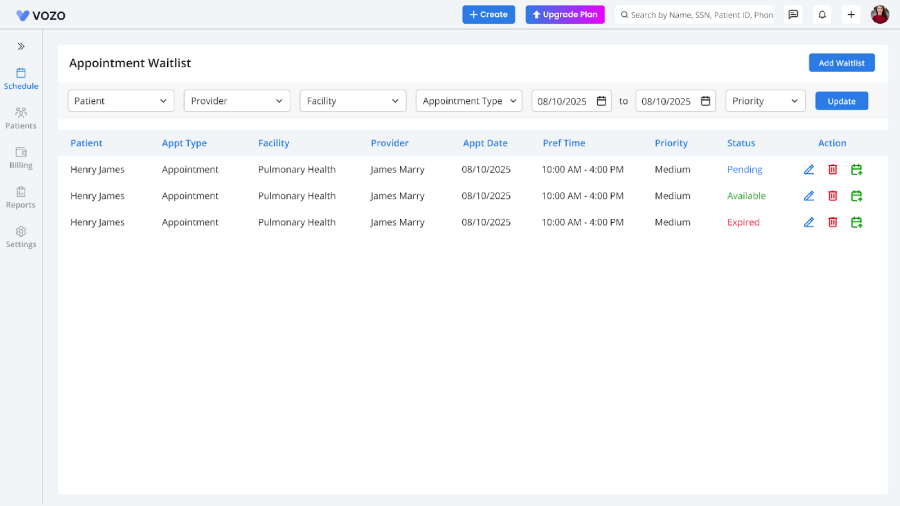
Appointment Profile Enhancements
A new “Waitlist Appointment” button has been added next to Telehealth Appointment.
When selected, the interface updates with the following columns:
Patient | Provider | Office | Appointment Type | Date | Time | Priority | Reason | Action
Actions available:
- View: Opens the existing Waitlist pop-up.
- Transfer: Opens the Calendar pop-up to confirm scheduling.
Enhanced filter options are also available for easier navigation.
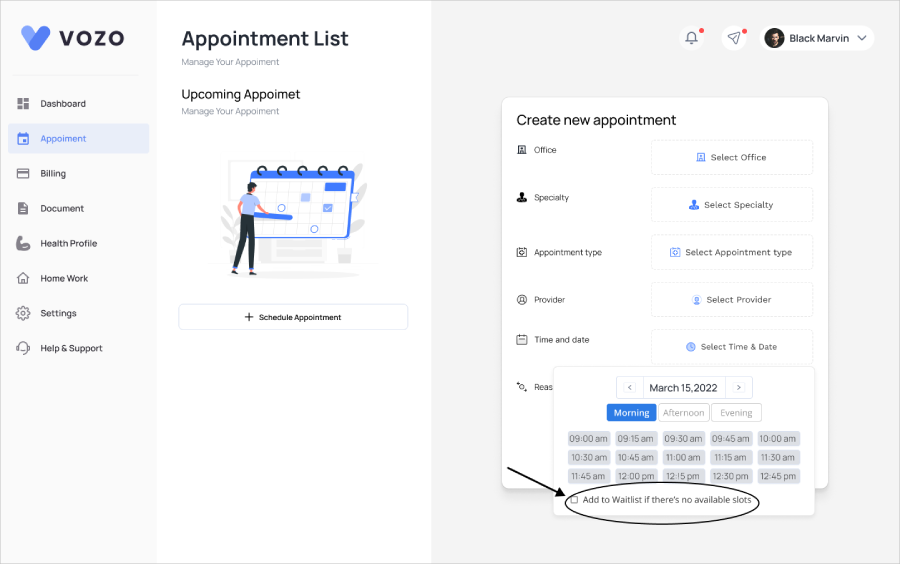
Patient Portal Enhancements
Patients now have the ability to join a waitlist directly from their appointment booking flow.
When a desired time slot is unavailable:
- A “Join Waitlist” button appears
- Patients can select preferred date, time, and priority level (future only)
- Upon saving, the appointment appears in the left panel with a highlighted Waitlist tag
- The record remains in waitlist status until confirmed
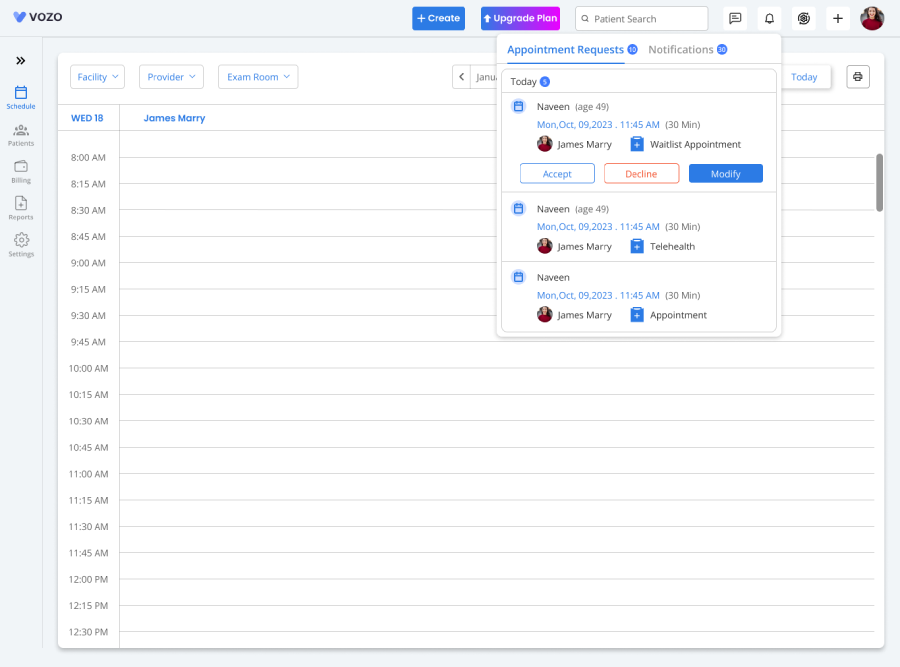
Provider Notification & Workflow
- Providers receive notifications for new patient waitlist requests
- Providers and staff can Accept, Modify, or Reject the waitlist request
- Accept: Adds the entry to the Waitlist List View
- Modify: Opens the Waitlist pop-up for editing
- Reject: Cancels the request as per normal workflow
Role-Based Access & Permissions
- Providers: Can view and manage only their assigned waitlisted patients (CRED access: Create, Read, Edit, Delete)
- Admin/Staff (Full Calendar Access): Can view all patient records and perform all CRED actions across the Waitlist.
Key Benefits
- Reduce unfilled appointment slots due to last-minute cancellations
- Improve provider utilization and calendar efficiency
- Enhance patient satisfaction with flexible scheduling options
- Streamline front-office workflows and reduce manual coordination
- Enable patients to self-manage appointment preferences
How to Access
You can access the new Patient Waitlist feature from:
- Calendar → Waitlist Button
- Appointment Profile → Waitlist Appointment
- Patient Portal → Join Waitlist
External Calendar One-Way Appointment Sync
Providers can now connect their Google Calendar, Outlook Calendar, or Apple Calendar to Vozo EHR. Every appointment created, updated, rescheduled, or cancelled in Vozo will automatically appear in the connected calendar — so providers can see their full schedule in one place without opening the EHR.
How to Connect a Calendar
Vozo Appointment Actions and Calendar Sync
| Vozo action | What happens in external calendar |
|---|---|
| New appointment created | A matching event is added automatically to all connected calendars within moments of saving. |
| Appointment updated (time, date, location) |
The corresponding event is updated in all connected calendars to match the latest details. |
| Appointment rescheduled | The event date/time is updated — the old slot is replaced, not duplicated. |
| Appointment cancelled / deleted | The event is removed from all connected calendars. |
What the Calendar Event Shows
🔒 Shows
- Appointment date
- Start and end time
- Provider name
- Location
- Appointment title
🚫 Does Not Sync
- Clinical notes
- Diagnosis
- Billing data
- Patient contact details
Task Management Revamp
The Task Management module has been redesigned to reduce unnecessary navigation, add a new List View alongside the existing Board View, and make categories and statuses configurable directly from the main screen.
What Has Changed
- Task Template button: No longer available in the header.
- Show Unarchived button: No longer available in the header.
- Add New Task button: Unchanged and still creates a new task.
- Board / List view toggle: Added to the top right of the screen.
- Quick Create shortcut: The top navigation “+” button now includes “Create a Task”.
Board View — Kanban
| Task card shows | Details |
|---|---|
| Category tag | Colour-coded badge showing the task category. |
| Priority tag | High / Medium / Low / Urgent. |
| Task title | The main task name. |
| Patient name | The patient linked to this task. |
| Assignee | Who the task is assigned to. |
| Due date | When the task is due. |
| Overdue indicator | Red badge with warning icon if the task is past due. |
| Actions | Edit and Delete icons. |
List View — New
| List column | What it shows |
|---|---|
| Checkbox | Tick to select one or more tasks for bulk actions. |
| Title | Task name. |
| Patient | Linked patient name. |
| Category | Category badge. |
| Status | Editable dropdown — change status inline without opening the task. Saves instantly on selection. |
| Priority | High / Medium / Low / Urgent badge. |
| Assignee | Who the task belongs to. |
| Due Date | Date the task is due. |
| Actions | Edit and Delete icons. |
Inline Category and Status Management
Patient Portal Activation at Patient Registration
This release note is written for front-desk staff and clinical coordinators. No technical background is needed. By the end you will know how to activate the Patient Portal and send intake forms to a patient at the exact moment you register them in Vozo — in a single flow.
The Problem This Solves
Vozo already supports sending intake and assessment forms to patients through the Patient Portal. However, forms can only reach the patient if their Patient Portal has been activated first. The activation step lived in a completely separate part of the system — meaning a new patient could be registered, their forms could be assigned, but those forms would silently fail to arrive because the portal was never turned on.
This created a gap that was easy to miss: a front-desk staff member adds a new patient, assigns intake forms, but never activates the portal — and the patient never receives anything. The practice only discovers the problem when the patient arrives for their appointment without having filled in their forms.
This release closes that gap by bringing the Patient Portal activation directly into the Create Patient popup — the same screen where the patient is first registered. Now the entire new patient onboarding workflow — registration, portal activation, and form delivery — can be completed in one uninterrupted sequence.
What Is New in the Create Patient Popup
A new toggle or checkbox has been added to the Create Patient popup, labelled “Enable Patient Portal Access.” It sits alongside the other patient details fields and includes a short message explaining that enabling it will allow the patient to receive and complete their intake and assessment forms.
| New element | Details |
|---|---|
| Enable Patient Portal Access toggle / checkbox | Optional — not mandatory. Staff can leave it unticked if the patient should not have portal access yet. |
| Helper message next to the toggle | A brief note explaining that enabling the portal means the patient will receive their forms to complete digitally. |
| What happens when you tick it and click Save | Instead of saving directly, a “Send Templates” popup appears before saving completes, so you can choose and confirm which forms to send. |
Step-by-Step: Adding a Patient with Portal Activation
Send or Skip — What Each Button Does
✅ Click “Send”
- Selected forms are delivered to the patient’s portal immediately
- Patient receives an email with a link to log in and complete the forms
- Patient record is saved in Vozo
- Patient Portal is activated
- Form status shows as Pending until the patient submits
⏭️ Click “Skip for now”
- No forms are sent at this time
- Patient receives an email with the Patient Portal link only
- Patient record is saved in Vozo
- Patient Portal is still activated
- Forms can be sent later via Documents → Send Intake Forms
The Send Templates Popup — All Options Explained
| Popup element | What it does |
|---|---|
| Pre-selected templates list | Shows the forms already configured as “Shareable Templates” in your practice settings. These are ticked by default — ready to send as-is. |
| Deselect a form | Untick any pre-selected form to remove it from this send. It will not be sent to this patient. |
| Search field | Search for additional forms from the Template Library. Select a form to add it to the send list for this patient. |
| “Require Patient to Sign” checkbox | When ticked, the patient is required to add their signature before they can submit each form. This is useful for consent forms, intake agreements, and any document that needs a formal sign-off. |
| “Send” button | Sends all selected forms to the patient’s portal and completes the patient registration. |
| “Skip for now” button | Completes the patient registration and activates the portal WITHOUT sending any forms. A portal activation email is still sent to the patient. |
How This Fits With the Existing Intake Form Workflows
This new flow is an additional entry point — it does not replace or remove any existing ways of sending forms. Here is how all three methods relate:
| Method | When to use it | Where it is |
|---|---|---|
| 🆕 Portal activation at registration (this feature) |
For new patients being registered for the first time. One combined step: register + activate + send forms. | Create Patient popup → Enable Patient Portal Access toggle |
| Automated send on portal activation (existing) |
When the portal is activated separately after the patient record already exists. System automatically sends Shareable Templates. | Patient record → Enable Patient Portal Access button |
| Manual send at any time (existing) |
For re-sends, additional forms, or forms for existing patients who have not yet received them. | Patient profile → Documents menu → Send Intake Forms |
Quick Reference — The New Patient Onboarding Flow
- Open Create Patient popup
- Fill in patient details (including a valid email address)
- Tick “Enable Patient Portal Access”
- Click Save
- Review forms in Send Templates popup
- Optionally tick “Require Patient to Sign”
- Click Send → forms go to portal immediately, patient record created
Common Questions
Third-Party Integrations Module
A new centralised Integrations page is now available in Settings. Administrators can connect, configure, enable, disable, and monitor all third-party service integrations from one screen — without hunting through different settings areas.
Integration Categories and Initial Integrations
| Integration | Category | What it connects |
|---|---|---|
| Email Notifications | Notifications | Sends email alerts to patients and staff. |
| SMS Notifications | Notifications | Sends text message alerts. |
| Voice Notifications | Notifications | Automated voice call reminders. |
| Stripe Payments | Payments | Card payment processing. |
| H2H Clearinghouse | Clearinghouse | Electronic insurance claims submission. |
| Availity | Eligibility | Insurance eligibility verification. |
Each Integration Card Shows
| Card element | What it means |
|---|---|
| Status badge | Connected (green), Disconnected (grey), or Error (red). |
| Toggle switch | Turns the integration ON or OFF. Turning ON without API credentials configured opens the configuration form automatically. |
| Last Sync timestamp | Shows when the integration last successfully communicated with the external service. |
| Edit button | Opens the configuration form to update API key or other credentials. |
Connection States Explained
Connected
Disconnected
Error
Flowsheets
Flowsheets provide a single, structured view of patient data over time. Instead of opening individual visits, providers can review vitals and submitted forms in one read-only table with dates across columns and data types as rows.
What Is a Flowsheet?
📊 Vitals
- Blood Pressure
- Temperature
- Pulse
- Weight, Height
- Respiratory Rate
📝 Forms
- Patient-submitted forms only
- PHQ-9, GAD-7, intake forms
- Portal submissions only
Where to Find Flowsheets
Default View on Load
| Setting | Default Value |
|---|---|
| Date range | 7 records |
| Active tab | Vitals |
| Sort order | Oldest → newest |
| Scrollbar | Hidden (fits screen) |
| Hidden rows | None |
Date Range Filter
| Selection | What it means | Use case |
|---|---|---|
| 7 Days | Latest 7 records (not calendar days) | Quick review |
| 15 Days | Latest 15 records | Monthly analysis |
| 30 Days | Latest 30 records (max) | Long-term trends |
Scrolling Behaviour
Hide and Unhide Rows
| Action | Behaviour |
|---|---|
| Hide row | Removes it from table instantly |
| Unhide | Restores all hidden rows |
| Visibility | Only appears when rows are hidden |
| Tab independence | Vitals and Forms are separate |
Export to CSV
| Export rule | Behaviour |
|---|---|
| Active tab only | Vitals OR Forms (not both) |
| Date range | Exports selected records only |
| Hidden rows | Excluded from export |
| Format | Matches existing CSV format |
| Columns | Patient and Provider data separate |
- Select correct tab
- Set date range
- Unhide rows
- Click Export
End-to-End Workflow
Common Questions
Treatment Plan
A structured clinical module to define diagnoses, goals, objectives, and interventions. Supports progress tracking, reminders, provider comments, signatures, and full PDF export for compliance and care coordination.
What Is a Treatment Plan?
Plan Structure
📋 Plan Level
- ICD Codes
- Provider
- Start Date
- Description
🎯 Goal → Objective → Intervention
- Goal = Outcome
- Objective = Step
- Intervention = Action
Two Form Types
| Feature | Default Form | Simple Form |
|---|---|---|
| Structure | Goal → Objective → Intervention | Free-text |
| Goal tracking | Yes (X/Y) | No |
| Best for | Chronic care, mental health | Quick notes |
Plan List Columns
| Column | Description |
|---|---|
| Provider | Owner of the plan |
| Plan Name | Title |
| Description | Preview text |
| Start Date | Plan start |
| Goals Completed | X/Y (Default only) |
| Actions | View / Edit / Reminder |
Goal Hierarchy Rules
Goal Status Tracking
| Status | Meaning |
|---|---|
| In Progress | Active work |
| Completed | Goal achieved |
| Cancelled | No longer relevant |
Plan Status Behaviour
| Status | Behaviour |
|---|---|
| In Progress | Fully editable |
| Completed | Locked, except signature |
| Cancelled | Locked |
Comments & Signature
📝 Comments
- Timestamped
- Editable
- Chronological history
✍ Signature
- Name + date
- Shown in PDF
- Editable after completion
Reminder System
| Action | Behaviour |
|---|---|
| Set Reminder | Choose future date |
| Trigger | 12 AM notification |
| Indicator | Icon in list |
| Cancel | Remove reminder |
End-to-End Workflow
Key Rules
- End date is auto-calculated
- One provider owns the plan
- Completed plans are locked
- New plan required for changes after completion
Measurement-Based Care (MBC)
A clinical tracking system that uses standardized assessments to measure patient outcomes over time, generate automatic scores, trigger alerts, and feed structured data directly into clinical workflows.
What Is MBC?
Built-In Assessment Tools
| Tool | Measures | Use |
|---|---|---|
| PHQ-9 | Depression | Severity + suicide risk |
| GAD-7 | Anxiety | Anxiety tracking |
| AUDIT-C | Alcohol use | Risk screening |
| C-SSRS | Suicide risk | Emergency detection |
| Fall Risk | Fall risk | Mobility safety |
| Pain Scale | Pain level | Intensity tracking |
| PROMIS | Outcomes | Quality of life |
| ADL / IADL | Function | Independence level |
Where to Access
👨⚕️ Provider
- Patient Chart → Documents
- Measurement Tool tab
- List + Graph views
🧑💻 Patient
- Patient Portal → Documents
- Assigned assessments
- Online completion
Assessment List View
| Column | What it shows |
|---|---|
| Assessment | Name of tool |
| Date | Completed or due date |
| Score | Latest score |
| Flag | Green / Yellow / Red severity |
| Action | View, Notes, Plan, Medications |
Graph View
Assignment Workflow
Alert Triggers
C-SSRS moderate/high → Emergency alert
AUDIT-C above threshold → Alcohol risk
Pain > 8 → Severe pain
Fall Risk high → Fall alert
Scoring Examples
| Tool | Range | Severity |
|---|---|---|
| PHQ-9 | 0–27 | Minimal → Severe |
| GAD-7 | 0–21 | Minimal → Severe |
| Pain | 0–10 | Mild → Severe |
| PROMIS | T-score | Normal → Severe |
Clinical Integration
SOAP Notes
Treatment Plan
Medications
End-to-End Workflow
Key Rules
- Scoring is fully automatic
- Alerts trigger instantly
- Red flag = clinical attention required
- Trend graphs show 3–12 records
- Custom assessments supported
Dedicated Provider Dashboard
A unified dashboard that brings appointments, notes, forms, patient activity, and billing into a single screen — allowing providers and coordinators to understand their day instantly without navigating multiple modules.
The Problem This Solves
Where to Find the Dashboard
Dashboard Layout
Left Column
- Upcoming Appointments
- Appointment Waitlist
- Forms
- Recent Patients
Right Column
- Appointment Requests
- Unsigned Notes
- Patient Portal Activity
- Pending Invoices
Dashboard Cards Reference
| Card | Key Data | View All Destination |
|---|---|---|
| Upcoming Appointments | Patient, Time, Provider, Status | Schedule → Calendar |
| Appointment Requests | Patient, Date, Type | Requests popup |
| Waitlist | Patient, Preferred Time | Schedule → Waitlist |
| Unsigned Notes | Patient, Date, Provider | Note Taking |
| Forms | Patient, Form, Status | Forms module |
| Portal Activity | Patient actions | Settings → Activities |
| Recent Patients | Name, Created Date | Patients list |
| Pending Invoices | Invoice, Amount | Reports → Invoices |
Interactive Actions
Appointment Requests
Waitlist
Unsigned Notes
- Each card shows 3 recent records
- Column headers match full module
- Click “View All →” for full list
- Data is live at page load
Key Behaviors
| Feature | Behavior |
|---|---|
| Personalisation | Shows data for logged-in provider |
| Record count | 3 preview rows per card |
| Navigation | Direct links via View All |
| Refresh | Reload page for latest data |
| Permissions | Data varies by user role |
End-to-End Usage
Key Rules
- Dashboard is provider-specific
- Cards show preview, not full data
- Actions available on selected cards
- Live data updates on reload
- Permissions control visibility
Patient Group & Group Appointments
Create reusable patient groups, schedule group sessions in one step, track attendance, add notes, and bill each patient individually — all within a single workflow.
The Problem This Solves
What Is a Patient Group?
- Reusable collection of patients
- Example: Anxiety Group, Diabetes Cohort
- Has provider, status, date range
- Supports recurring sessions
Patient Group List Columns
| Column | Description |
|---|---|
| Group Name | Name of the group |
| Group ID | System-generated ID |
| Status | Active / Inactive |
| Patient # | Total patients |
| Provider | Assigned provider |
| Date Range | Start and End dates |
| Action | Edit / Delete |
Create Patient Group
Schedule Group Appointment
| Field | Description |
|---|---|
| Group Name | Select group |
| Type | Walk-in or Telehealth |
| Date & Time | Session timing |
| Facility | Location |
| Provider | Session owner |
| Reason | Session purpose |
Attendance Management
- Set status per patient
- Add notes or services
- Remove patient from session
Attendance Status
| Status | Description |
|---|---|
| Scheduled | Expected |
| Arrived | Attended |
| No Show | Missed |
| Cancelled | Cancelled |
Notes Types
📝 Group Note
- Shared across all patients
- Session-level documentation
🧍 Individual Note
- Per patient
- Specific observations
Billing Rules
End-to-End Workflow
Key Rules
- Patients can belong to multiple groups
- Removing from session ≠ removing from group
- Group note is shared across all patients
- Billing always individual
- New patients apply only to future sessions
Vital Graph & List View
View patient vital history instantly through an interactive graph or structured list. Analyse trends, edit records, and export data — without leaving the patient workflow.
The Problem This Solves
How to Access
Vitals Covered
| Vital | Unit | Range |
|---|---|---|
| Blood Pressure | mmHg | 90–120 / 60–80 |
| Temperature | °F | 97–99 |
| Pulse | bpm | 60–100 |
| Respiratory Rate | breaths/min | 12–20 |
| Weight | kg/lbs | Trend only |
| Height | cm/in | Trend only |
Graph View
- Shows max 30 recorded dates
- One vital at a time
- Hover to see exact values
- Threshold lines indicate normal range
Graph Elements
| Element | Description |
|---|---|
| X-axis | Dates of recorded vitals only |
| Y-axis | Measurement scale |
| Lines | Vital trend values |
| Threshold | Normal range markers |
| Hover | Exact values + date |
List View
| Feature | Description |
|---|---|
| Rows | One per date |
| Columns | All 6 vitals |
| Edit | Modify record inline |
| Print single record | |
| Export | CSV download |
Filtering
- Select Start Date and End Date
- Only dates with data are shown
- Export respects filters
Editing a Vital
Graph vs List View
| Feature | Graph | List |
|---|---|---|
| Purpose | Trend analysis | Record review |
| Data | One vital | All vitals |
| Edit | No | Yes |
| No | Yes | |
| Export | Graph data | CSV |
Key Rules
- Max 30 records displayed
- Graph shows one vital at a time
- Blood Pressure shows two lines
- Filters apply only in List view
- Switching views is instant
Intake Form Sending
Automate intake forms for new patients and send forms anytime for existing patients. Eliminate paper workflows and ensure all patient data flows directly into the chart.
The Problem This Solves
What Are Intake Forms?
- Patient demographics
- Medical history
- Insurance details
- Consent forms
- Custom practice-specific forms
Two Sending Methods
| Method | Trigger | Use Case |
|---|---|---|
| Automated | New patient + portal activation | Standard onboarding |
| Manual | Staff action | Resend / extra forms |
Automated Workflow (New Patient)
Manual Workflow (Any Patient)
Template Configuration
- Configured in Settings → Template Library
- Applies to all patients
- Editable but not deletable
- Changes affect future sends only
Patient Experience
| Step | What patient sees |
|---|---|
| Portal login link | |
| Login | Access forms |
| Fill | Mobile-friendly forms |
| Submit | Confirmation message |
Staff Review Workflow
Key Rules
- Portal required for sending
- Automation triggers once only
- Manual send works anytime
- All actions logged for audit
- Forms auto-save to patient chart
Growth Chart
Track pediatric growth automatically using WHO percentile charts. Every recorded measurement is plotted instantly — enabling accurate, real-time clinical assessment without manual calculations.
The Problem This Solves
What It Does
- Automatically plots child measurements
- Displays WHO percentile curves
- Shows growth trends over time
- Includes measurement history table
How to Access
Chart Tabs
| Tab | Measurement | Purpose |
|---|---|---|
| Length / Height for Age | Height vs Age | Growth trend baseline |
| Weight for Age | Weight vs Age | Under/overweight detection |
| Weight for Length | Weight vs Height | Body proportion assessment |
| BMI for Age | BMI vs Age | Obesity / nutrition tracking |
How to Read the Chart
| Element | Meaning |
|---|---|
| WHO Curves | Standard growth reference lines |
| 50th Percentile | Average growth line |
| 25–75 Range | Normal healthy range |
| Below 3rd | Possible growth delay |
| Above 97th | Possible accelerated growth |
| Blue dotted line | Patient’s actual measurements |
Age Range Filters
- 0–6 months
- 0–2 years
- 6 months–2 years
- 2–5 years
- 0–5 years (full view)
Measurement Table
Key Rules
lbs = kg × 2.20462
- Charts auto-adjust based on patient gender
- Applies only to patients aged 0–5
- No manual data entry required for plotting
- All measurements are plotted in real time
- Percentiles calculated automatically
Medication Refill Request
Enable patients to request prescription refills digitally while providers review and approve instantly. Eliminates manual coordination and reduces turnaround time from hours to seconds.
The Problem This Solves
How It Works
- Patients request refills via portal
- Providers review and approve instantly
- eRx sends prescription directly to pharmacy
- Status updates automatically
Patient Workflow
Patient Status Tracking
| Status | Meaning |
|---|---|
| Pending | Awaiting provider review |
| Approved | Refill approved |
| Rejected | Refill declined with reason |
| Sent to Pharmacy | Prescription transmitted |
Provider Workflow
Built-in Safety Rules
| Condition | System Behavior |
|---|---|
| Inactive medication | Refill button hidden |
| No refills remaining | Warning message shown |
| Medication discontinued | Refill disabled |
Audit Trail
Key Rules
- Patients can only request active medications
- Providers must approve all requests
- eRx sends prescriptions automatically if enabled
- Status updates are real-time
- All actions are logged for compliance
DPC Membership Plan
Offer subscription-based care with automated billing, real-time coverage validation, and zero manual claims for included services. Build predictable revenue while simplifying patient experience.
What Is DPC?
Why Practices Use DPC
- Predictable recurring revenue
- No insurance claim overhead for covered services
- Improved patient retention and loyalty
- Lower patient volume with stable income
Create a DPC Plan
| Setting | Description |
|---|---|
| Plan Name | Display name for staff and patients |
| Fee | Monthly or annual amount |
| Billing Frequency | Monthly or Annual |
| Included Services | Visits, telehealth, preventive care, etc. |
| Status | Active / Inactive |
Patient Enrollment Workflow
Encounter Billing Logic
| Scenario | System Behavior |
|---|---|
| Covered service | $0 charge, no claim, tagged as “Covered by Membership” |
| Non-covered service | Standard invoice generated, insurance allowed |
Invoices & Payments
| Process | What Happens |
|---|---|
| Invoice generation | Auto-created on billing date |
| Email delivery | Sent automatically |
| Payment | Auto-charged via saved card |
| Failure | Notification + retry logic |
| Status | Updated instantly |
Reports
📊 Membership Report
- Active members
- Inactive members
💰 Revenue Report
- Total revenue
- Outstanding payments
- Invoice status
Patient Portal Experience
Key Rules
- Plans must be Active for enrollment
- Billing is fully automated
- Covered services always cost $0
- No claims for covered services
- Membership auto-renews based on billing cycle
Lifestyle & Diet Recommendation
Capture daily patient habits, enable provider feedback, and assign personalized diet plans — transforming care from episodic visits into continuous monitoring and guidance.
The Problem This Solves
What This Feature Does
- Patients log daily habits
- Providers review and comment
- Diet plans assigned directly
- Trends tracked over time
Patient Workflow
Lifestyle Entry Fields
| Category | Examples |
|---|---|
| Sleep | Hours slept |
| Water | Glasses consumed |
| Activity | Exercise type + duration |
| Mood | Emotional state |
| Food | Meals / diet details |
| Measurements | Weight, BP, etc. |
Calendar View
Provider Workflow
Diet Recommendation Types
| Type | Use Case |
|---|---|
| Curated Library | Predefined plans for common conditions |
| Custom Recommendation | Patient-specific plan |
| Global Library | Reusable clinic-wide plans |
Review Status
| Status | Meaning |
|---|---|
| Pending Review | Awaiting provider feedback |
| Reviewed | Feedback added and visible |
Key Rules
- Patients can log entries daily
- Providers control visible categories
- Comments appear instantly in portal
- Diet plans are read-only for patients
- All entries are timestamped and stored
Batch Eligibility
Verify insurance coverage for all scheduled patients in minutes instead of hours. Eliminate manual calls, reduce claim denials, and ensure accurate billing before the patient even arrives.
The Problem This Solves
What Batch Eligibility Does
- Select a date (e.g., tomorrow’s appointments)
- Vozo identifies all scheduled patients
- Runs eligibility checks simultaneously
- Returns results within minutes
- Highlights issues before visits happen
How to Access
Run Eligibility Check
Eligibility Status Guide
| Status | Meaning | Action |
|---|---|---|
| ✅ Active | Coverage valid | No action |
| ⚠ Review Needed | Coverage active but conditions apply | Check details |
| ❌ Inactive | Policy not valid | Contact patient |
| ⚠ Policy Lapsed | Expired coverage | Update insurance |
| ❌ Patient Not Found | Mismatch in data | Correct details |
| ⚠ Deductible Not Met | Out-of-pocket required | Inform patient |
| ⚠ Copay Updated | Payment amount changed | Update billing |
| ⏳ Pending | No response | Retry or call payer |
Insurance Claims Screen Columns
| Column | Description |
|---|---|
| Appointment Date | Visit date |
| Patient | Patient name |
| Office | Facility |
| Payer | Insurance company |
| Billing Status | Payment state |
| Claim Status | Submission status |
| Action | Generate claim form |
Best Practices
- Run eligibility the evening before appointments
- Always review yellow and red statuses
- Update insurance data immediately when changes occur
- Use payer filters to handle denials in bulk
- Track repeat problem patients
Key Rules
- No limit on number of patients per run
- Results are saved automatically
- Individual checks can be re-run anytime
- Not all payers support electronic verification
- All results stored for audit and compliance
Good Faith Estimate (GFE)
Create, send, and track legally compliant cost estimates for uninsured and self-pay patients — ensuring transparency, reducing disputes, and meeting federal requirements automatically.
What Is a Good Faith Estimate?
When GFE Is Required
| Scenario | Required? |
|---|---|
| No insurance | Yes |
| Self-pay (insured but opting out) | Yes |
| Out-of-network | Yes |
| Insurance used normally | No |
| Patient requests estimate | Yes |
How to Access
Header Fields
| Field | Description |
|---|---|
| Title | Name of estimate |
| Date | Creation date |
| Expiration | Auto 12 months |
| Service Date | Planned visit date |
| Provider | Auto fills NPI |
| Facility | Auto populated |
Services Table
| Field | Description |
|---|---|
| CPT / HCPCS | Procedure code |
| Description | Auto-filled |
| Quantity | Number of services |
| Fee | From fee schedule |
| Diagnosis | ICD-10 code |
| Total | Auto-calculated |
- Add multiple services using “+ Add Service”
- Total cost calculated automatically
- Additional notes supported
Send & Patient Workflow
Documents Management
| Action | What it does |
|---|---|
| View | Preview document |
| Print copy | |
| Download | Save PDF |
| Delete | Remove record |
Compliance Coverage
• Written estimate delivery
• Patient acknowledgement tracking
• Permanent record storage
• Itemised cost breakdown
• Provider & facility inclusion
Key Rules
- Editable before patient signs
- New GFE required after changes
- Portal required for digital signature
- Valid for 12 months by default
- All records stored for audit
Patient Estimate Calculator
Instantly calculate patient out-of-pocket costs using real-time insurance data. No calls, no guesswork — accurate estimates in seconds.
The Problem This Solves
What It Does
- Fetches real-time insurance data
- Calculates exact patient responsibility
- Breaks down copay, deductible, coinsurance
- Saves and shares estimate instantly
How to Access
Required Inputs
| Field | Description |
|---|---|
| Insurance Type | Primary / Secondary |
| Payer | Insurance company |
| Provider | Auto-selected |
| Date of Service | Appointment date |
| CPT Code | Procedure code (required) |
| ICD-10 | Diagnosis code |
Run Estimate
Estimate Results Explained
| Field | Meaning |
|---|---|
| Billed Amount | Practice charge |
| Allowed Amount | Insurance-approved amount |
| Deductible | Remaining patient deductible |
| Copay | Fixed visit fee |
| Coinsurance | % patient pays |
| Insurance Payment | What insurer pays |
| Patient Responsibility | Total patient owes |
Summary Calculations
- Total Visit Cost = Sum of all CPT services
- Insurance Payment = Coverage portion
- Patient Responsibility = Final out-of-pocket cost
Save & Share
Common Errors
| Error | Fix |
|---|---|
| Missing fields | Fill required inputs |
| Invalid patient data | Verify DOB, Member ID |
| Timeout | Retry |
| Payer not supported | Manual check |
| Authorization required | Contact insurer |
Best Practices
- Run at time of scheduling
- Verify insurance details before running
- Use correct CPT codes
- Discuss high costs upfront
- Always save estimate for records
Key Rules
- Real-time insurer data
- Save only after results load
- No estimate without CPT code
- Supports multiple services
- Stored for audit and disputes
Superbill Generation
Generate a complete, professional billing summary of any patient visit in one click. Includes diagnoses, procedures, provider details, and charges — ready for insurance submission or patient use.
The Problem This Solves
What Is a Superbill?
- Full summary of a patient visit
- Includes CPT and ICD-10 codes
- Lists provider and patient details
- Shows total charges
- Used for reimbursement or billing validation
How to Generate
What the Superbill Contains
| Section | Includes |
|---|---|
| Patient | Name, phone, email |
| Provider | Name, NPI, contact info |
| Encounter | Date, location, POS code |
| Services | CPT codes, quantity, fees |
| Diagnosis | ICD-10 codes |
| Charges | Total, discounts, billed amount |
Available Actions
| Action | Purpose |
|---|---|
| Download | Save PDF locally |
| Provide physical copy | |
| Share | Send via patient portal |
| Send directly to patient | |
| Delete | Remove and regenerate |
Patient Portal View
Provider Settings
- Auto-email Superbills to patients
- Add logo to PDF
- Customize footer information
- Configure email message template
Superbill vs Invoice
| Type | Purpose |
|---|---|
| Superbill | Visit summary for insurance reimbursement |
| Invoice | Payment request to patient |
Key Rules
- One Superbill per encounter
- Multiple Superbills allowed per patient
- Cannot edit PDF after generation
- Requires completed encounter
- All records stored for audit
Billing Credit Flow
Track, display, and apply patient overpayments accurately. Eliminate negative balances and manage credits cleanly across all billing workflows.
The Problem This Solves
What Is a Credit?
- Extra payment stored on patient account
- Always shown as a positive value
- Displayed as “Patient Credit – $X.XX CR”
- Can be applied to future invoices
Where You See Credit
| Location | What You See |
|---|---|
| Appointment Billing | Patient Balance + Patient Credit |
| Patient Payments | Unapplied Credit column |
| Payment Analysis | Credit totals and breakdown |
| Clinical Reports | Credit column added |
How Credit Is Created
- Overpayment on invoice
- Copay higher than EOB amount
- Payment on $0 visit
- Insurance adjustment differences
EOB Credit Example
How to Apply Credit
What Changed (Fixes)
• Credit no longer auto-applies
• Payment popup shows correct values
• Credit reduces correctly after use
• Insurance balances stay accurate
New UI Additions
| Feature | Purpose |
|---|---|
| Patient Credit line | Shows total credit |
| Unapplied Credit option | Use credit for payments |
| Credit columns | Visible in reports |
| Credit totals | Practice-wide reporting |
Key Rules
- Credit does not auto-pay invoices
- Must be manually applied
- Credit reduces after use
- Does not expire by default
- Refund handled separately
Deductible, Coinsurance & Patient Owes
Capture patient responsibility with complete accuracy using separate fields for copay, deductible, coinsurance, and patient owes — each generating its own invoice automatically.
The Problem This Solves
The Four Responsibility Fields
| Field | Meaning | Example |
|---|---|---|
| Copay | Fixed visit fee | $20 per visit |
| Deductible | Patient pays before insurance | $50 remaining deductible |
| Coinsurance | % after deductible | 20% of $80 = $16 |
| Patient Owes | Total responsibility from EOB | $16 from insurer |
Key Change
→ Each field generates its own invoice automatically
→ Full transparency for patients and billing teams
EOB Entry Fields
| Field | What to Enter |
|---|---|
| Allowed Amount | Insurance-approved amount |
| Copay | Collected at visit |
| Deductible | Patient responsibility before coverage |
| Coinsurance | Percentage-based share |
| Patient Owes | Total from EOB |
| Insurance Paid | Amount insurer paid |
| Write-Off | Billed vs allowed difference |
Invoice Generation Logic
- Copay → Copay Invoice
- Deductible → Deductible Invoice
- Coinsurance → Coinsurance Invoice
- Patient Owes → Patient Owes Invoice
Scenario Example
Editing Rules
| Status | Can Edit? |
|---|---|
| Not Created | Yes |
| Created | No |
| Paid | No |
| Partial | No |
Eligibility Enhancements
• Deductible (met + remaining)
• Copay per visit
• Coinsurance %
• Patient responsibility
Where It Appears
| Screen | Usage |
|---|---|
| Appointment Billing | Invoice breakdown |
| Patient Payments | Line-item invoices |
| Statements | Patient clarity |
| Ledger | Audit tracking |
| Reports | Financial analytics |
Key Rules
- Each field creates its own invoice
- No combined patient responsibility
- Editing locked after invoice creation
- Improves audit and reporting accuracy
- Enhances patient billing transparency
Risk Assessment & Preventive Health Screening
Automatically track preventive screenings and detect clinical risks in real time using guideline-based triggers from labs and vitals — ensuring no critical condition is missed.
The Problem This Solves
Two Connected Features
📋 Health Screening
- Tracks due and overdue tests
- Based on age, ICD, frequency
- Provider-driven workflow
🚨 Risk Assessment
- Auto-triggers from labs & vitals
- Flags abnormal values
- Immediate clinical alerts
Guideline Setup
- Configure in Settings → Screening Guidelines
- Define age range, frequency, ICD codes
- Applies automatically to patients
Guideline Types
| Type | Examples |
|---|---|
| Vitals | BP, BMI |
| Vaccination | Flu, Pneumococcal |
| Screening | Mammogram, A1C |
| Others | Counselling, Risk reviews |
Health Screening Table
| Column | Meaning |
|---|---|
| Test Name | Screening test |
| Due Date | System calculated |
| Status | Due / Overdue / Done |
| Type | Guideline category |
Screening Actions
Risk Assessment Table
| Field | Description |
|---|---|
| Test Name | Triggered test |
| Source | Lab or Vitals |
| Value | Recorded value |
| Status | Risk level |
Risk Levels
- 🔴 High Risk → Immediate action
- 🟡 Moderate Risk → Monitoring needed
- ⚠ Abnormal → Review required
Trigger Sources
• Lab results
• Vitals recorded during visits
Risk Actions
| Action | Purpose |
|---|---|
| Details | View full risk info |
| Care Plan | Create treatment plan |
| Schedule Visit | Book follow-up |
End-to-End Workflow
- Admin sets guidelines
- System assigns screenings
- Provider orders test
- Lab result received
- System triggers risk alert
- Provider takes action
Key Rules
- Guidelines apply automatically
- Due dates are system-controlled
- Risk triggers are automatic
- Notify can only be sent once
- All actions are tracked
Refund Module
Process full or partial refunds with complete audit tracking, automatic patient notifications, and built-in credit-first logic — all within a single controlled workflow.
The Problem This Solves
Where Refund Can Be Initiated
| Entry Point | Use Case |
|---|---|
| Billing Section | Invoice review |
| Total Balance | Account-level review |
| Appointment Balance | Visit-level refund |
| Patient Page | Direct invoice refund |
Refund Types
💯 Full Refund
- Refunds entire amount
- Amount auto-filled
- Field locked
➗ Partial Refund
- Refund specific amount
- Editable field
- Multiple allowed
Refund Methods
| Method | Behavior |
|---|---|
| Cash | Manual refund outside system |
| Cheque | Manual issuance |
| Card | Auto-refund via payment gateway |
Credit Balance Logic
- Full credit → no cash/card issued
- Partial credit → remaining refunded
- No credit → full refund issued
Refund Workflow
What Happens After Submit
- Invoice updated
- Patient balance adjusted
- Credit balance updated
- Audit log created
- Email sent to patient
- Refund report updated
Refund Report
Patient Portal View
- Refund amount
- Date
- Method
- Invoice reference
Validation Rules
| Error | Reason |
|---|---|
| Invalid amount | Must be numeric |
| Exceeds paid amount | Not allowed |
| Missing reason | Mandatory field |
Key Rules
- Credit applied before refund
- Partial refunds allowed multiple times
- Full refund locks amount
- Card refunds irreversible
- All actions logged
Imaging Menu
Manage the complete imaging lifecycle — from order creation to result review and physician sign-off — all within the patient record with full traceability.
The Problem This Solves
Three Core Tabs
📋 Imaging Orders
- Create and track orders
- Monitor status
- Import results
📄 Imaging Results
- Review results
- Sign-off workflow
- Finalised reports
⚙️ Imaging Test
- Configure imaging types
- Define tests catalogue
- Required before ordering
Imaging Order Workflow
Order Status Logic
| Status | Meaning |
|---|---|
| Pending | No results uploaded |
| Partial | Some results uploaded |
Importing Results
- Select specific test
- Enter radiologist name
- Upload file
- Save result
Supported File Types
| Type | Use |
|---|---|
| JPEG / PNG | Images |
| Reports | |
| DCM | DICOM medical imaging |
Result Review Workflow
Result Status
| Status | Meaning |
|---|---|
| Not Signed | Awaiting review |
| Signed | Finalised |
Imaging Catalogue Setup
- Create Imaging Types (Radiology, MRI, etc.)
- Add tests under each type
- Required before providers can order
Structure Example
MRI → Brain MRI, Knee MRI
Ultrasound → Abdominal, Pelvic
End-to-End Workflow
- Admin sets up catalogue
- Provider creates order
- Staff uploads results
- System tracks status
- Provider reviews and signs
- Final report stored in patient record
Key Rules
- Orders move forward only (no rollback)
- Partial status until all results uploaded
- Results must be signed to finalize
- DICOM handled internally
- Setup required before use
Care Plan, Care Goals, Monitoring & Tasks
Structure patient care with team-based goals and track ongoing monitoring activities with scheduled actions — enabling coordinated, continuous care across providers.
The Problem This Solves
Two Connected Modules
📋 Care Plan
- Defines treatment programme
- Assigns care team
- Sets goals and outcomes
📅 Monitoring & Tasks
- Tracks ongoing activities
- Schedules recurring checks
- Logs actions per occurrence
Care Plan Workflow
Care Plan Statuses
| Status | Meaning |
|---|---|
| Draft | Not active yet |
| Active | In progress |
| Inactive | Paused |
| Cancel | Stopped |
Care Team Access Rules
- Team members can create goals
- Only team members can be assigned
- Non-team providers cannot manage goals
Care Goals
| Field | Description |
|---|---|
| Description | Goal definition |
| Target Outcome | Expected result |
| End Date | Completion target |
| Assigned Provider | Responsible team member |
Automatic Notifications
- Goal end date reached
- Provider added to plan
- Goal assigned to provider
- Care plan end date reached
Monitoring Activity Workflow
Activity Actions
| Action | Meaning |
|---|---|
| Done | Completed |
| Skip | Not completed |
| Comment | Add note |
| Reset | Clear status |
Frequency Rules
- Daily → repeats every day
- Weekly → repeats weekly
- Monthly → repeats monthly
- Yearly → repeats yearly
- Multiple time slots allowed
Care Plan + Monitoring Link
End-to-End Workflow
- Create care plan
- Add team and goals
- Create monitoring activity
- Link to care plan
- Track scheduled actions
- Complete goals and close plan
Key Rules
- Care plan required for team coordination
- Monitoring link is optional
- Multiple goals supported
- Multiple activities supported
- All actions tracked and auditable